Help Topics
Kick Start: Your poll in 2 Easy Steps
Creating a poll is trivial: Enter your questions and send the vote link to your audience. That’s it!
Just click this button on the homepage:
Step 1: Enter your questions
First, provide the questions: Every question consists of the question itself and one or more answers to it. Type the question into the input-field named “Enter question”. Answers are entered either after hitting the tab-key or by pointing and clicking into the desired answer field.
Clicking the following button, after inserting your e-mail
We ask for your e-mail to keep you informed about the ongoing development of DirectPoll.
Step 2: Manage the links
You need three links to manage your poll:

This voting link is static: no matter what you do with your poll (add or remove questions etc.) this link will always work. But please be aware that the poll expires 30 days after the initial creation or last save.
Results: The result link will show the real-time results while your audience is voting. Open it on any display you like. All you need is a browser. Be sure to use a big display so everyone can enjoy the animation while votes are dropping in.
The result page will display the QR-Code before you start the poll and whenever you stop it. Your audience can scan or enter the URL easily.
Cockpit: This is your administration link. It opens the Cockpit for you. You’re free to add questions, re-arrange the order of the questions or reset votes at any time.
You’re receiving these links in an e-mail to your address the first time you save the poll. If you lose the Cockpit link, you will not be able to use your poll anymore.
Bonus Step: Select a different Look

In addition, you can select whether you want to display the Vote-Link URL on the result page for your audience’s convenience.
Create your Poll
In order to create a poll you just need to open your Cockpit. This is the place where you add your questions; choose the look and where you steer the poll.
Prepare questions
You will prepare the questions for your audience upfront. But know that you can also create and enter them on the fly, even when your poll is running.
Enter questions
Poll questions consist of the question text and one or more answers. Entering the questions is simple: Type the question text and the answers in the input-fields. New empty questions and answer fields will appear automatically, as soon as all blanks are filled. Note that empty questions and empty answers will be ignored when the poll is saved.
Define question type
You can choose between single-choice and multiple-choice questions. (Additional question types are in preparation.) Just select from the dropdown menu next to the question.
Re-arrange questions
Just drag-and-drop the questions using the arrow handle. You can also re-arrange answers within a question.
Delete questions and answers
Delete questions and answers using the corresponding delete handles.
Restrict your Poll
Restrict access to your poll by checking the “Restrict this Poll” checkbox. This essentially allows you to control who can vote by sending a “login” token to all users you wish to be able to vote. Note that exactly one vote per question is accepted per token. Using a restricted poll therefore also ensures that every token holder has exactly one vote, even if they use multiple differnt browsers and or manually delete / maniuplate the cookies that are sent to the browser.
Read and accept our Terms and Conditions
This step prompts you to get familiar with our usage of your e-mail and accept the Terms and Conditions.
Save your Poll
Clicking the following button, after inserting your e-mail
Question Settings
Mark the Correct Answer
DirectPoll lets you display the correct answer after your audience has cast their votes. Here is a step-by-step documentation howto work with the feature.
1) Check “Mark the correct answer” Make sure that the checkbox “Mark the correct answer” answer is checked. You find it in the “Settings” section of each question.
2) Check “Mark as correct” Now check all correct answers with the corresponding check box that is shown on the right of each answer. All the checked answers will be highlighted after this question has been answered.
3) Poll Let your audience cast their votes. The correct answers will be shown when you click “Next” (or “Pause”) in the cockpit.
This screenshot shows a result page that displays the correct answer:

Hide Answers while Polling
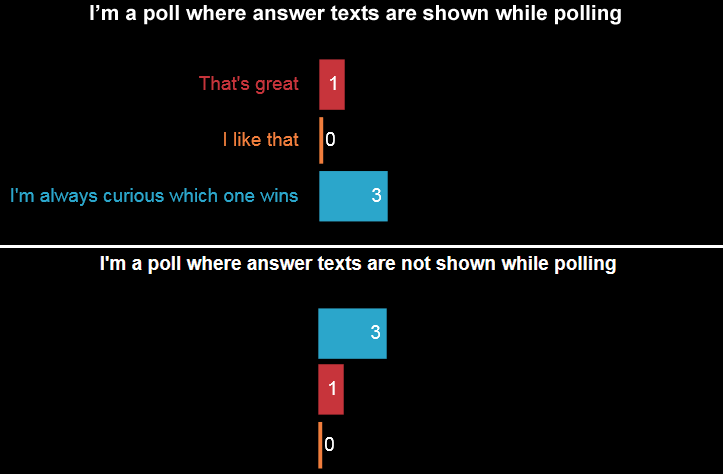
Sometimes it’s bothering to see which answer gets the most votes during a poll. That might influence voters who are unsure to just tick the option that feels most correct. Therefore you might like to hide the answer text on the result page while polling. Your voters will see all answer options on their phone while casting their votes.
1) Check “Hide answers while polling” Make sure that the checkbox “Hide answers while polling” answer is checked. You find it in the “Settings” section of each question.
2) Poll Start the poll or click “Next” when you’re already casting votes. The answer with the most votes will appear on top of the result-screen when the option “Hide answers while polling” is active.
3) Reveal the answer texts Just click “Next” (or “Pause”) in the cockpit. The answer texts will appear immediately. (A second click on “Next” moves on to the next question or stops the poll if this was the last question.)
This screenshot shows a result page with and without answer texts:
Prepare for the Presentation
All necessary information to set up your poll for your presentation are collected in the section “Links”.
Vote-Link
Results-Link
Cockpit-Link
Send links via mail
Change your e-mail address if necessary or just make sure to have all necessary links delivered to your inbox.

Change the look and feel of the results page
Last but not least you may want to adapt the visual appearance of your poll results. Just click on the desired look and feel. The frame on the preview will change to a thick red line to notify you that this look is active.
Additionally, you can select whether the Vote-Link URL is shown on the result page for your audience’s convenience.
Conduct your Poll
You steer a poll with the cockpit.
Activate your poll
Just click
Current question
The active question is clearly labelled with a thick red line. You can activate any question either with the Cockpit control, tapping it or by clicking it with your mouse.
Control poll
The poll is controlled with the Cockpit Control, see chapter Cockpit Controls for detailed information.
End your poll
No specific action required. You may like to use
Change Questions while conducting the poll
Existing questions may be edited and even new questions may be added while conducting a poll. Any changes will be activated as soon as the poll is saved.
Cockpit Controls
You’re going to steer your poll with the same interface. A control unit will be shown in the upper part of the page if you have more than one question in your poll. The control unit is named “cockpit”.
Start your poll
The poll is ready to receive votes after clicking “START” on the cockpit
Pause/resume poll
You may pause your poll at any time by clicking “PAUSE”
Step through questions
Questions are switched step-by-step with the “NEXT” control.
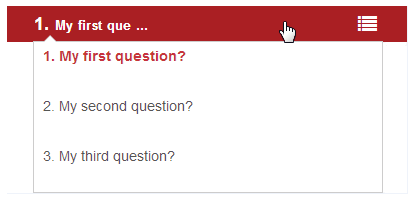
Switch to a specific question
Switching to a specific question out of sequence is easy with the dropdown menu on the question-control element.
End your poll
“STOP” immediately ends your poll. No votes are accepted any more and the result page switches back to it’s initial state. The cockpit-control element switches back to the initial state too.
Using the Result Page Cockpit
A simple cockpit on the result page enables you to control the poll directly from the result page. It appears when you touch the result page or move your mouse. You may start, step to the next question, pause or stop your poll.
Control your Poll from your presentation
A poll can be controlled from within a presentation using control links. Control links offer functions like “start poll”, “stop poll” or “next question”. This works with presentation software which allows you to put a link to an external website on your slide.
Step to next Question and show result
This link comes with a special feature.
Once opened it will always activate the next question in line when you press reload in your browser. This means in fact that you can steer your whole poll from a simple browser window!
Step to a specific question and show result
You can embed specific links for every question into your presentation. They can be picked up in the section “Advanced Links”.
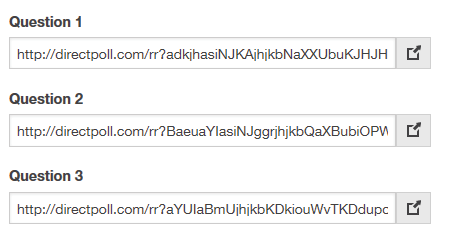
We recommend these links if you intend to switch back and forth between slides (and therefore between questions). This will prevent you from activating an unwanted question by accident.
Embed a poll into your presentation
Using a Plugin
The Poll results page can be embedded in some presentation programs using a plugin. That way, you don’t have to leave the presentation: just navigate to the slide that contains the embedded Poll results page to show the Poll to your audience.
Microsoft PowerPoint offers a Web Viewer Add-In. Read how to add an Add-In for PowerPoint here.
Apple Keynote, Google Slides and Prezi do not currently offer plugins of their own to embed live websites in their presentations.
A possible alternative is the free Live Slides Application which creates slides with Embedded web content for Keynote and PowerPoint.
Using a web browser
You can switch from the presentation to a web browser showing the results screen. You can make this transition appear seamless by putting the browser in full-screen mode on the presentation screen before you start playing the presentation. That way, when you temporarily switch out of the presentation, the DirectPoll result screen is shown.
Advanced Result Links
The links in this section are helpful if you intend to perform your poll in a normal way but like to step back to former results and just display them.
Current result
This link always shows the results of the current question. Useful when you have a setup with two independent screens, where you’re able to present your poll on one display and steer it from the second one. This is a common setup in big event halls
Result of a specific question
This is a static link to a specific question. You can display the result of a specific question independently of whether it is the current question or not. These are useful links if you like to return to former results, e.g. at the end of a presentation. Note: these links will always display the result of the respective question, even when the poll is stopped.